The four base towers, and why Kingdom Rush only gives you four
Four towers. Three upgrade tiers each. Two advanced classes at level 4. Everything else in Kingdom Rush — the strategy, the difficulty, the whole skill curve — comes out of how you combine those four.
Most tower-defense games throw fifteen towers at you and make you sort them into a spreadsheet. Kingdom Rush does not. It gives you one tower for each of four jobs, and every enemy in the game is designed so that at least one of those four answers it cleanly.
The four jobs are:
- Archer Tower — cheap, relentless single-target physical damage. The backbone of most maps and the only cheap answer to flying units.
- Barracks — produces physical blockers that body-block the path. Not a damage tower in the usual sense. It buys your damage towers time and coverage.
- Mage Tower — magic damage, which ignores physical armour. Your answer to armoured enemies, including most bosses.
- Dwarven Bombard — slow, expensive, area-of-effect physical damage. Your answer to swarms, dense packs and anything that walks in a crowd.
Those four jobs map onto four things enemies vary on: armour (mage or nothing), magic resistance (archers and artillery), air (archers, cheaply), and how many of them there are (artillery, or a barracks wall). Add armour as a fifth axis and every single enemy in the campaign falls into at least one of them. That is the design reason there are only four towers, and it is why adding a fifth type would make the existing four worse rather than better.
Two rules follow from this and they matter more than any individual upgrade:
- Physical damage is reduced by armour, and is the wrong tool against magic-resistant enemies. Magic damage ignores armour, and is the wrong tool against nothing in particular — it is just expensive.
- Area damage is worth several times its single-target equivalent, but only when it actually catches a group. A bomb that hits one enemy is a very expensive arrow.
The full upgrade path
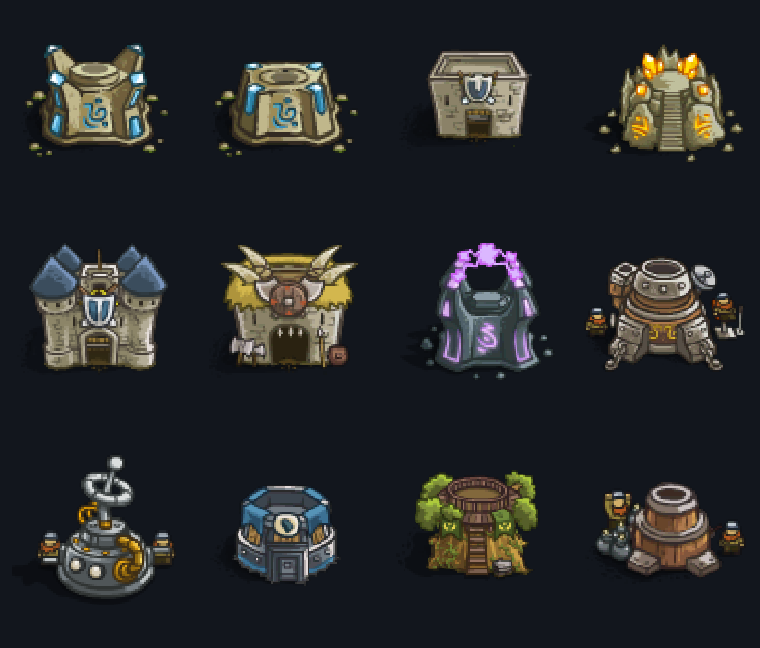
Levels 1, 2 and 3 are straight upgrades — each one is bought on the same tower with gold and the next tier replaces the last visually and mechanically. Level 4 is the branch, and it costs more than the whole rest of the tree put together. That is deliberate: the level-4 choice is the real decision in Kingdom Rush, and it is expensive enough that you cannot have all four towers maxed.
| Tier | Name | What it adds | Notes |
|---|---|---|---|
| 1–3 | Archer Tower → Marksmen → Sharpshooter | Range, damage, faster reloads | The bread-and-butter physical line |
| 4a | Rangers Hideout | Web snare, root, can hit air | The cheap anti-air answer |
| 4b | Musketeer Garrison | Long range, heavy single-target damage | The anti-boss answer |
| 1–3 | Militia → Footmen → Knights Barracks | Tougher blockers, more bodies | Blocking gets real only here |
| 4a | Holy Order | Footmen with a ranged attack | Blocking that also deals damage |
| 4b | Barbarian Mead Hall | Bigger pool, stronger bodies, Hunting Nets | Blocking plus team-wide damage |
| 1–3 | Mage Tower → Adept → Wizard Tower | Spell reach and growing magic damage | Cheapest answer to armour |
| 4a | Arcane Wizard | Teleport between positions, arcane rays | Coverage, not burst |
| 4b | Sorcerer Mage | Earth elemental, armour weakening | Turns physical towers into anti-armour towers |
| 1–3 | Dwarven Bombard → Artillery → Howitzer | Bigger, faster cluster shells | Your only real crowd control |
| 4a | Tesla x104 | Chain lightning between targets | Anti-swarm, best with Smart Targeting |
| 4b | 500mm Big Bertha | Enormous single-target damage, tiny splash | Anti-boss, not anti-swarm |
The Archer line: cheap damage and the two ways to specialise it
Archer Tower is the first thing you build and the last thing you stop building. It scales further than any other line, it is the only tower cheap enough to build three or four times, and its level-4 branch splits into two towers that solve completely different problems.
The tiers are straightforward. Archer Tower does modest damage at short range and hits ground and air for the same cost as nothing else in the game. Marksmen Tower roughly doubles the damage and extends the range, which is usually the first meaningful spike on the whole map. Sharpshooter Tower adds a further jump and lengthens range again, and by this point it covers most of a standard map from a safe back position.
Tiers 2 and 3 are where most of your archer value lives, and they are also where the common beginner mistake happens: holding gold for a level 4 while four un-upgraded archers leak. A tower at tier 1 does a fraction of the work of the same tower at tier 3 for a fraction more gold. Upgrades are almost always the better buy early, because they apply to every enemy that walks past, forever.

Rangers Hideout vs Musketeer Garrison
At level 4 the archer line forks, and the two branches are built from different materials. Rangers Hideout is the anti-air and anti-swarm pick. Musketeer Garrison is the long-range single-target pick. Neither is strictly better. Choosing wrong costs you the stage.
Rangers Hideout
Rangers trade raw damage for utility and coverage. Their web attack snares enemies in place, holding a group still, and it also roots — a stunned enemy cannot move, which in practice means your artillery and mages get free, uninterrupted hits. That is the real value: Rangers do not kill more, they make everything else kill more.
Rangers also hit flying units, cheaply and indefinitely. Any stage with bats, harpies or dragon riders that survives a steady stream of arrows will eat that web snare on a choke point and lose a large slice of its wave budget. If your air problem is "annoying", archers solve it. If your air problem is "bosses with wings", you want Rangers.

Musketeer Garrison
Musketeers drop the utility and keep the damage, then push it much further. They have the longest range of any archer tower and hit hard against a single target. The practical effect is that a Musketeer covers a large share of the map from a corner, can start shooting before anything else on the lane is in range, and hits an armoured ogre or a boss meaningfully harder than any archer alternative.
The cost is that a Musketeer is a poor answer to crowds. Single-target damage does not scale when eight enemies walk past at once. Pair it with artillery and with a barracks that actually blocks, and it becomes excellent. Stand it alone against a swarm wave and it will not keep up.

Pick rule
Ask one question: what is failing? If enemies reach the exit in groups and your damage is too slow, buy Rangers and let the snare buy you time. If one specific enemy is soaking too much damage — a boss, an armoured unit, a healer — buy the Musketeer and give it a clear lane. Air pressure with swarm waves on top of it? Rangers, every time.
The Barracks line: blocking is a damage multiplier
People build barracks last because they do not shoot anything. Build them first. A body-block converts every slow, single-target, splash-losing tower you own into a tower that is hitting one target for a long time instead of moving through a whole wave.
The first three tiers of the barracks line are the same idea, better built. Militia Barracks produces militia in small numbers. Footmen Barracks produces more of them, faster, and they soak more damage. Knights Barracks produces heavily armoured knights that genuinely stop a boss for a moment. The purpose of all three is the same: stand in the road, do not move, and buy seconds.
What blocking actually does
When you build on a road tile, your tower stops firing and your units step into the road. Everything behind them stops. That has three effects, and all three are worth money:
- Archer and Musketeer towers get unlimited time on one target instead of a fraction of a second on six.
- Artillery shells that would have landed on one enemy now land on the entire queue behind it. This is the single biggest jump in the game and it is free.
- Mage towers and soldiers behind the block can attack in safety, because nothing behind the block is taking hits.
Blocking also gives you a place to put a hero. A hero standing on a blocked tile is effectively invulnerable while the block holds, which is how you use a level-3 hero on an otherwise impossible wave.

Holy Order vs Barbarian Mead Hall
Both advanced barracks block. What they do while blocking is the difference, and it is a bigger difference than most players expect.
Holy Order
Holy Order is the unlimited footmen branch. Its recruitment pool is not a small fixed list that gets depleted and refilled on a timer — you get a steady supply of footmen, and they add a ranged attack on top of their blocking. That means a Holy Order is both a wall and a damage source, which makes it the better default pick on nearly every stage.

Barbarian Mead Hall
Barbarians are the bigger, harder-hitting wall with a twist. Their recruitment pool is limited and must refill, so they are not always on the road. In exchange you get substantially stronger units per body, and their signature ability in the Flash version is Hunting Nets — the ranged attack drops enemies into place and holds them, working alongside whatever else is on the lane.
(If you have played the mobile and later titles, note that the Flash barbarian uses Hunting Nets. Whirlwind-style abilities are not part of this build.)

Placement trap
Do not build a barracks early in a lane that later turns out to be your artillery spot. You cannot build a tower on a tile occupied by units, and selling a barracks mid-wave leaves the road open at the worst possible moment. Decide your choke points first, then place barracks second.
The Mage line: magic ignores armour
Armour reduces physical damage. It does nothing at all to magic. The entire mage line exists to exploit that, and it is why a single Mage Tower can be worth more than three archers on a stage full of armoured enemies.
Mage Tower has good range and modest magic damage. Adept Tower is the first real jump — more reach and a noticeable damage increase, and it will suddenly feel like an answer to whatever was shrugging off your archers. Wizard Tower adds more of both. Mage towers hit flying units too, which makes them the second anti-air option after archers, but they cost more, so archers stay the default.

Arcane Wizard vs Sorcerer Mage
Arcane Wizard
The Arcane Wizard is a coverage pick. It can relocate itself along the map with a teleport, which means one tower can patrol two separate stretches of road, and its arcane rays let it hit targets the basic spell cannot reach. Damage is not the reason to buy it. Flexibility is.
Choose Arcane Wizard when the level has two distant lanes, when you cannot afford a second mage tower, or when the path crosses itself so one position sees only half the traffic.

Sorcerer Mage
The Sorcerer is a damage pick with a team effect. It summons an earth elemental that fights alongside it, and it weakens enemy armour in its area. That second ability is the real prize: it temporarily removes the armour that was blunting every archer, Musketeer and cannon on the map.
A Sorcerer plus a couple of physical towers behind it will out-damage a stack of archers on an armoured wave. The cost is that it is committed to one position and one damage type, so it does nothing about air crowds or spread-out lanes.

The Artillery line: crowd damage, and the blast edge nobody warns you about
Artillery is slow and it is expensive. It is also the only tower in the game that makes twenty enemies feel no harder than five, provided you understand how its splash actually works.
Dwarven Bombard lobs shells in a slow arc. It takes a while to reload and it takes a while to aim, which makes it bad against fast single targets and fine against everything else. Dwarven Artillery reloads faster and throws bigger cluster shells that break into a spread on impact. Dwarven Howitzer improves both again. From tier 2 onwards you are dealing real area damage, and from tier 3 the shell size is large enough to catch a whole queue.

The splash problem, and why Smart Targeting is the best upgrade in the game
By default, artillery damage falls off towards the edge of the blast. Maximum damage lands at the centre; an enemy on the rim takes a fraction of that. This is easy to misread as "my cannon feels weak". It is not weak — you are just catching enemies on the wrong part of the circle.
The Smart Targeting upgrade changes the whole shape of the tower. With it, every enemy inside the radius takes full damage. Same range, same shell, dramatically more output against any group that is not perfectly stacked. If you build exactly one upgrade across a whole playthrough, make it this one on a Howitzer.
Remember this
No Smart Targeting means a bomb that only hits hard in the middle. With Smart Targeting, the whole radius is maximum damage. The same upgrade also raises Tesla chain damage from roughly half its listed range to the full listed range, so it pays twice.
Tesla x104 vs 500mm Big Bertha
Tesla x104
The Tesla is the swarm answer. It fires a chain of lightning that jumps between nearby enemies, so a dense pack takes hit after hit from one shot. It has almost no single-target punch — against one armoured enemy it is close to useless — and it needs Smart Targeting to be worth the stars. Bought correctly, it is the best tower on the map for a late swarm wave.

500mm Big Bertha
The Big Bertha is the opposite pick: enormous single-target damage, a slow reload, and splash that is far less useful than a Howitzer's. On a boss or on a single very tough enemy, nothing in the game deletes health faster. On a swarm wave, it is a very expensive Howitzer that hits fewer enemies.

| Damage type | Reduced by armour? | Reduced by magic resist? | Scales with crowd size? |
|---|---|---|---|
| Physical Archer, Musketeer, Rangers, Footmen | Yes — heavily | Partly | No |
| Magic Mage, Adept, Wizard, Sorcerer | No | Yes | No |
| Physical Bombard, Artillery, Howitzer, Big Bertha | Yes | Partly | Yes, via splash |
| Chain Tesla x104 | Yes | Partly | Yes — its whole identity |
| Utility Tesla, Rangers web, Sorcerer weaken | n/a | n/a | Acts as a damage multiplier |
| Air coverage Archers, Rangers, Mages | Depends | Depends | Rangers web the whole pack |
Placement: where each tower type actually belongs
Correct upgrades in the wrong tile lose. Same upgrades in the right tile hold a lane that should be impossible. Placement is worth more than any single upgrade in the game.
Chokepoints
Find the tile where the road is narrowest, or where two segments of road come close enough that one tower can cover both, and build there. A tower at a chokepoint does the work of two towers elsewhere. On most stages there are exactly two worth having, and they are usually not near the exit — the exit is the last resort, not the plan.
The inside corner
The strongest single tile in Kingdom Rush is the inside corner of a bend, where the road turns back on itself. A cannon or Musketeer there can hit enemies twice as they round the turn, because they pass through its blast radius and firing arc twice. Pair an artillery tower there with a barracks a few tiles upstream and you have the standard tournament-level combo.
A corner cannon plus a barracks blocking two tiles before it is the strongest generic arrangement in the game. Almost every stage has a bend that supports it.
Next to a barracks
Any tower you want to fire continuously should sit behind a block. This is the practical version of the splash rule: artillery placed directly behind a barracks catches the entire stopped queue. Artillery placed across the map, on the other side of the road, catches one or two enemies and does the same job far worse.
Back-line vs front-line
- Back-line: Musketeer, Sorcerer Mage, Arcane Wizard, Big Bertha. Long range, high value per shot, and worth protecting. Put these at the edge of your buildable area where they cover the most road.
- Mid-line: Rangers, Howitzer, advanced Archer towers. They want a moderate stretch of road and ideally a blocked lane in front.
- Front-line: Barracks, first-tier towers. Cheap, sacrificial in position but not in cost — never place a tower you cannot afford to lose right next to the leak.
The blocking rule for artillery
State it plainly, because it is the highest-value rule on the page: artillery gets free splash only when the road is stopped. With no block, a shell lands on whatever happens to be under it, usually a thin file. With a block, the same shell lands on the full pile of everything waiting behind it. Artillery without a barricade in front of it is a single-target tower with a splash animation.
The standard strong build
Barracks at a narrow point, artillery immediately behind it at the inside corner, a Musketeer or Archer tower at the far end covering the approach, and a Mage Tower somewhere it can reach the armoured units that survive. Four towers, four jobs, no wasted tile.
Tower abilities, and when to trigger them by hand
Some towers fire a special ability on a cooldown. Almost every player triggers these too early. Hold them for the wave that matters.
The general rule: an ability that stuns, snares or slows is worth many times more on a boss or elite wave than on a trash wave, because it buys your damage towers extra shots on the enemy that has the most health. An ability that does area damage is worth more on a crowd wave, and nearly worthless on a single ogre.
- Stun or root ability — hold it for the wave with the most elite units. A three-second stun on a boss is worth roughly three seconds of free DPS from every tower you own.
- Single-target burst — hold it for the moment the enemy is already in range of your artillery. Chasing it with a hero does nothing.
- Area or slowing ability — save it for the wave after your block is holding a full queue.
Two abilities in the Flash build are worth specific attention. The Musketeer ability is a burst aimed at a single target — use it on the enemy that is already closest to the exit, not the biggest one. The Tesla chain is at its best when a swarm wave is fully stacked inside a barracks block; against scattered enemies the chain finds nothing to jump to.
On Sell Tower: selling refunds 60% of everything you have invested in that tower, including every upgrade. That refund is the reason late-game pivots work. If a stage is going wrong at wave 14, selling a mid-tier tower returns enough to build the right tower elsewhere. Do not sell to "start over" — sell to convert. The loss is real, and it is worth paying exactly once.
How many towers, and the economy behind them
The answer is fewer than you think. Kingdom Rush stages are built for four to six well-placed towers, not for filling every tile.
Every tower you build takes gold away from upgrades on the towers you already have. Early in a stage, extra towers compound — a second and third Archer Tower genuinely increase your total output. Late in a stage, that stops being true. A stage usually gives you enough gold for roughly one of two things: a wide spread of cheap towers, or a small number of strong ones. Trying to split the difference gives you neither.
The core principle
Two maxed towers beat four half-upgraded towers. Upgrades multiply everything already in range; new towers only add one more stream of damage. Once your positions are set, stop buying towers and spend the gold pushing tiers.
Front-loaded vs back-loaded
Front-loaded means buying cheap early and upgrading later. It is safer, survives mistakes, and is the correct approach on any stage you have not cleared before. Back-loaded means hoarding gold for a level-4 tower and building almost nothing until late. It is faster on stages you know, where the early waves are gentle enough to survive with two archers.
On anything new, front-load. A stage you lose at wave 9 teaches you nothing about wave 18, and you cannot get those upgrades back once the run ends.
A workable build order
- Two Archer Towers on the tightest part of the road. Enough to survive while you earn.
- A Barracks at the chokepoint. Its job is to exist, not to be strong.
- Upgrade, not expand. Push those archers to tier 3 before buying a fourth tower.
- Artillery behind the block. This is where area damage starts paying for itself.
- A Mage Tower for whatever is armoured, then a level-4 pick once the wave timing tells you which one you needed.
On repeat attempts and on stages you have solved, you can invert that: build the barracks and the level-4 artillery first, sell the cheap archers you no longer need, and reinvest the refund. That is the 60% rule used as a strategy rather than a rescue.
A few final habits worth keeping:
- Call waves early for the bonus gold, but only once your block is solid. Early gold you cannot survive through is worth nothing.
- Upgrade the tower that is already in range of the leak. Upgrading a tower that covers half the map while something else lets leaks through is wasted.
- Do not spread damage types evenly. Cover each weakness with one strong tower, rather than covering everything weakly.
Quick answers
The questions that come up most often about This page, answered directly.