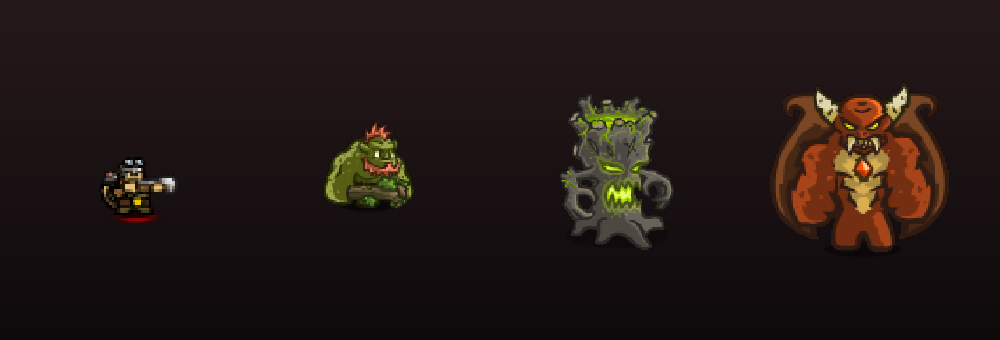
What makes a boss different from a normal elite
An elite is a tougher version of a unit you have already handled. A boss is a different problem class, and the differences are structural rather than statistical.
A boss health pool is large enough that a short burst will not close it. That single fact rewrites how you build. Normal waves reward you for damage that lands in a tight window, because the wave is over and you take stock. A boss is over roughly when your total damage output can cover the pool, which means your damage has to be continuous and correctly typed for the whole length of the fight. A tower that does nothing because of a resistance is not a small loss over a long fight — it is a tower slot you spent real gold on contributing nothing to the entire encounter.
Second, a boss has a resistance profile, and it is visible before you start. The wave preview shows the enemies you are about to face and their traits. Armor, magic resistance, and regeneration are not hidden statistics you are supposed to guess at; they are printed on the enemy. Read them before you commit a single coin. Almost every failed boss run in this game can be traced back to a player who read the wave preview and then built anyway.
Third, bosses arrive with adds. Elite escorts spawn alongside the boss and walk the same road. They are not decoration and they are not the objective, but they are the reason your hero dies if you send the hero to stand next to the boss. Adds soak aggro-free damage that would otherwise be going into the health pool, and some of them buff the boss directly, which converts a small add problem into a large health pool problem.
Fourth, boss fights are the stages where the free damage sources matter most. Barracks units body-blocking the road force the boss to wait, which means every tower on the map gets free seconds of firing. Artillery splash hits the boss and the adds in the same shot. Neither of these scales with your upgrade level, and both are worth more in a boss fight than the same investment made during a normal wave.
The upshot: boss damage is about whether your damage type matches, not about raw DPS. A player with a smaller board that all hits correctly beats a player with a larger board that is half the wrong type, every time.
The universal boss checklist
Run this list before every boss attempt, including the ones you have already beaten. Bosses get harder on their challenge modes and the mistakes come back.
- Read the wave preview. Check the boss's resistance profile before you build, not after you fail. Armor means bring magic or true damage. Regeneration means bring burst. Magic resistance means bring physical. Write down which one it is.
- Block the path at the last corner. The final corner before your exit is the highest-value tile in the game for a boss fight. Place artillery there, angled to cover the road segment the boss walks past. Splash on the last corner hits the boss and the trailing adds at the same time.
- Put artillery on the side the boss walks past. Not near your other towers, not on the visually tidy spot — on the side the road actually passes. Artillery placement is a coverage question, not an aesthetic one.
- Save Rain of Fire for the health pool. It is the single most expensive cooldown in the game, and on a boss fight its value scales with how much health is left. Firing it into a pack of trash adds to save a life is the most common wasted ability in boss fights.
- Keep the hero alive and levelled. A dead hero contributes nothing for the rest of the fight, and boss fights are long enough that "the rest of the fight" is most of it. Level your hero on every stage. Prefer abilities that buy time over abilities that deal damage.
- Never split your damage types. If your board is half physical and half magic, you have built two weak boards instead of one strong one. On a boss with a dominant resistance, the half that does nothing is pure dead weight — sell it and rebuild that slot as the type that works.
Before you press start
If you cannot say out loud what the boss's dominant resistance is and which of your towers answers it, do not start the fight yet. Take the wave preview, identify the type, and confirm you have at least one level-4 tower of that type. Everything else on this list is refinement. That one is the fight.
| Boss | Dominant resistance | Correct damage type | Key trick |
|---|---|---|---|
| Juggernaut | Heavy armor | Magic or true damage | Hero body-blocks at the last corner so the boss walks the full kill zone |
| Troll Warlord | High regeneration | Burst of any type | Artillery splash on the last corner; chip damage loses to regeneration |
| Vez'nan | Mixed, plus summons | At least three types at once | Control the summons in an artillery zone, spend ultimates on the health pool |
| Moloch the Archdevil | Varies — read the preview | Whatever the preview says | Free-content boss: read the profile before every attempt |
| Lord Blackburn | Varies — read the preview | Whatever the preview says | Undead campaign boss: check for summons before building splash |
The Juggernaut: the campaign's first real wall
The Juggernaut is where the campaign stops being generous. It is the first enemy in the core game that a well-placed archer tower simply cannot answer, and most players meet it with a board that is almost entirely physical.
Heavy armor is the whole mechanic. Physical damage is heavily reduced against it, and the reduction is severe enough that a good archer line will produce numbers that look respectable in aggregate and are irrelevant in practice. Arrows alone will not clear the Juggernaut. Not with a few towers. Not with upgrades. The type is wrong, and no quantity of the wrong type becomes the right type.
Mages and true damage are the answer. Mages ignore armor, which makes them the natural response. True damage ignores everything, which makes it the best response but the most expensive to build. Bring both if your board allows it: a mage line for sustained damage and one true-damage or armor-ignoring source for the burst that the health pool needs.

Why a level-4 tower matters here more than anywhere earlier. The stages before the Juggernaut give you room to win with a wide board of mid-level towers. This fight does not, because the boss's health pool is large enough that unupgraded damage never catches up before the escort adds overwhelm the line. Take one tower to level 4. Choose the branch that adds damage rather than the branch that adds a special effect — on this fight, raw output wins.
The hero's job is positioning, not damage. Send the hero to the last corner and body-block. A blocked boss stops moving, which means every tower on the map gets free firing time, which means the encounter is easier even though no individual shot improved. This is the clearest example in the game of time being the resource you are actually managing.
Juggernaut warning
Do not bring a physical-only board. If your best tower is an archer tower and your second-best is an artillery piece, you are walking into the campaign's first armor check with the wrong answer. Sell the archer line, build mages, and come back.
The Troll Warlord: when chip damage loses
The troll stages rotate the problem. Where the Juggernaut asks whether your damage type is correct, the Troll Warlord asks whether your damage arrives fast enough to matter.
High regeneration is the mechanic. A regenerating target heals back damage over time, so slow, steady chip damage is subtracted from almost nothing. Two low-damage towers firing steadily can produce a satisfying damage number and a boss that is exactly as healthy at the end of the wave as it was at the start. If your board is built entirely out of low-burst sources, you will lose this fight in a way that feels inexplicable because you never stopped damaging it.
You need burst. Artillery splash is the natural answer: one shot that hits hard enough to outpace the regeneration in a short window. Mages at a high tier deliver sustained magic damage that can also keep pace. What does not work is spreading your damage across many weak sources, because regeneration punishes exactly that shape.

Kill the regeneration source if there is one. Troll stages often bring support enemies whose buffs extend the fight. Those adds are not the objective, but they are the reason the objective is hard. Prioritize them with your hero while your towers hold the boss in place, and do not spend your artillery splash on them if the boss is already in range of it.
Block the path. The same trick applies as always, and it applies harder here: every second the Troll Warlord spends walking toward your towers is a second it is not regenerating. Barracks body-blockers and hero body-blocks are worth more on troll stages than on armored ones, because they attack the exact resource that is beating you.
Troll Warlord warning
If your damage is spread thin, you will lose slowly and blame the wave timing. It is not the timing. It is the shape of your damage. Concentrate it, or delay the boss so it cannot regenerate at all.
Vez'nan: the Dark Tower fight
The final boss is not a bigger Juggernaut. It is a different question: how many things can you be killing at once, and can you tell which of them is the one that matters.
The summons are the test. Vez'nan fights alongside a stream of enemies, and a board built only to kill one big health pool will spend the whole fight reacting to adds instead of making progress. That is a losing trade, because the adds stop coming when the boss stops. You need somewhere for the summons to die that is not your primary damage zone, and artillery splash over a clustered spawn point is that place.
Control beats damage here. Slows, stuns and knockbacks — from heroes and from tower abilities — are worth more against this fight than anywhere else in the campaign. A boss you can hold in one place is a boss taking full damage from three towers at once. A boss that walks is a boss that spends half the fight walking. Give hero points to control and survivability rather than to flat damage, because the control is what lets your damage land.
Spread your damage types on purpose. This is the one fight where a wide board is genuinely correct, and the rule about never splitting your types inverts. Vez'nan resists being solved by one answer. Bring physical, magic, and artillery, all at level 4 if you can afford it, so that no single resistance profile removes a meaningful share of your damage.
Spend ultimates on the health pool. Save Rain of Fire and your hero's ultimate for the boss itself. They are the tools that close a long health pool, and using them on adds throws away the only damage that scales with how much health is left.
Vez'nan warning
The most common loss is not damage output. It is spending the entire fight killing summons while the health pool sits untouched, and then discovering at the end that you had no cooldown left for the thing you actually had to kill. Clear the summons with splash, not with your ultimates.
Later free-content bosses
Beyond the core campaign there are additional bosses you unlock rather than reach. Treat them as new puzzles with the same underlying rules, and read the wave preview on every attempt the same way you would in the core game.
Moloch the Archdevil is the boss of the Burning Torment content, which arrived with two new heroes and five new enemy types. It sits at the end of a stretch built around enemies that stress builds you already have, which means the answer to Moloch is going to be a correction to your board rather than a new system. Expect to change your damage type at least once when you get there.
Lord Blackburn is the boss of The Curse of Castle Blackburn, a four-stage undead campaign that added eight new enemy types and was released as a Steam exclusive. If your version of the game does not show the campaign, you will not meet him; if it does, the encounter follows the standard boss rules — read the profile, block the last corner, and put splash where the adds gather.
The Fungal Forest, delivered as free content, brought a new hero and its own boss. It is one of the better places to learn the checklist because the stage is short and the fight is short, so you can iterate quickly instead of grinding a long map.
There is no meta reason to avoid these bosses and no reason to save them for the end. Every one of them pays stars into the same permanent upgrade trees, and they are the content you will be replaying in endless mode long after the core campaign is finished.
Boss mistakes that cost runs
Four failures account for most lost boss attempts. None of them are about execution. All of them are about decisions made before the fight started.
Splitting damage types
Half a board of the wrong damage type is not a partial solution. It is zero. Against a boss with a dominant resistance, every tower of the resisted type is a tower slot that contributes nothing for the entire encounter — and it is a tower slot you paid real gold for. Pick one type that works and commit to it.
Spending Rain of Fire on trash adds
Rain of Fire scales with how much health is left. Spent on a pack of escorts with a full boss standing behind them, it buys one wave's worth of breathing room and is then on cooldown for the entire health pool. Keep it for the boss. Handle adds with artillery splash, which is cheap and does not compete for the same resource.
Letting the hero die into the boss's swing
Bosses hit hard and their attacks have reach. A hero sent to stand next to the boss to get a couple of extra hits will die, and a dead hero is a hero that contributes nothing for the rest of a long fight. Position the hero where the boss must walk past it, not where the boss already is. Survival first, damage second — the fight is long enough that the hero's uptime matters more than its output.
Building no chokepoint
If you have not deliberately blocked a corner, you are not really fighting the boss — you are chasing it down the road while it heals or walks. The last corner gives you concentrated fire, free time from body-blockers, and splash coverage in one tile. It is the highest-value placement in the entire game, and it is the one most players leave empty because they built for the whole map instead of for the fight.
One-line summary
Match the damage type, delay the boss, hold the hero, and put artillery on the last corner. Get those four right and boss difficulty drops sharply. Get them wrong and no upgrade tier will save the run.
For the stages that these bosses appear in, and for how the whole run fits together, see the campaign walkthrough. For what each tower branch actually does, the tower guide covers the level-4 choices these fights depend on.
This is an independent fan guide for Ironhide Game Studio's Kingdom Rush, published originally by Armor Games. Where a mechanic differs in your version, trust what you see in your own wave preview.
Quick answers
The questions that come up most often about This page, answered directly.